Sooner or later, if you live and hike in California, you will set your sights on Shasta. Mount Shasta is the fifth highest peak in the state, but it’s unique in that it’s the only California 14er that’s a stratovolcano and the only one where you need to know how to use crampons, ice axe, and avalanche gear to climb the peak. My climbing buddy (George) and I summited in May 2022 self guided, and it was one of the most epic, hardest climbs we’ve ever done. Here are some general tips for climbing the peak, lessons learned, and a trip report at the end:
Logistics:
Thankfully, due to its difficulty Mount Shasta is still fairly easy to climb last minute, unlike the much more popular peaks such as Mount Whitney or Half Dome. The permitting process is low key — all you need is a Mount Shasta Summit Pass, which you can purchase at a ranger station or an outdoors store in town (we went to The Fifth Season, a great local store! https://thefifthseason.com/). As of 2025 a 3 day pass costs $25 and an annual pass costs $30. Buy the annual pass as a good luck token to the mountain weather gods; for an extra $5, you get 362 more chances to climb the peak if your first attempt fails.
This trip report is for climbing Mount Shasta from Avalanche Gulch. This challenging route gains approximately 7,000 feet of elevation over 11 miles round trip, typically taking 1-2 days to complete. The best time to climb Mt. Shasta via Avalanche Gulch is late May through early July, when the route has adequate snow coverage for crampons and ice axe travel, but before excessive snowmelt creates dangerous rockfall hazards. During this optimal spring window, climbers benefit from stable snow conditions in the early morning hours and generally more predictable weather, though storm systems can develop year-round. Proper mountaineering skills, equipment, and wilderness permits are required for this non-technical but physically demanding alpine climb.
Route on Alltrails:
https://www.alltrails.com/trail/us/california/mount-shasta-via-avalanche-gulch-route
Gear:
My climbing buddy (George) and I must’ve taken at least 40 pounds of gear each up the mountain. Much of this is safety gear, which we go into below. Most of your normal backpacking gear applies, but we found these additions incredibly helpful or necessary:
Snowshoes:
Snowshoes are going to be incredibly useful navigating up to Helen Lake, the traditional overnight spot for two day trips. If it’s a big snow year I would say that snowshoes are necessary, but you can most likely ditch them at your Helen Lake campsite and pick them up on the way down. You’ll want snowshoes that are made for mountaineering (the ones with the spikes on the bottom) so they can grip into the mountain. We used Retrospec, which we found to be inexpensive but durable.

Buy Retrospec Snowshoes on Amazon
Mountaineering Boots:
After Helen Lake, the route becomes steeper and icier as you make your way up to the Red Banks. You’ll want crampons strapped to mountaineering boots to bite into the ice. Microspikes will not do — this is a serious mountain. Mountaineering boots tend to be expensive, but you can rent them from most outdoors stores. We rented budget La Sportiva’s for about $50, or you can buy them on Amazon:

Buy La Sportiva Mountaineering Boots on Amazon
Crampons:
I’ve always been a big fan of the Black Diamond Contact Strap Crampons. They’re easy to use, fit most boot types, and have taken me up several peaks without any wear and tear. You can also rent these from most outdoor stores, but they’re nice to have if you plan on doing any other hikes in winter on steeper terrain. Make sure you check that the crampons fit on your boots BEFORE you set out on the trail.

Buy Black Diamond Contact Strap Crampon on Amazon
Ice Axe:
You’ll want an ice axe in case you fall. It also helps with having a third point of contact on the peak for stability, and is useful as a substitute for a hiking stick. Shasta is steep and a slip can bring you to the bottom hundreds of feet below if you don’t arrest yourself. Almost every year a couple people die on Shasta, mostly when conditions are pure, hard ice when crampons don’t bite into the mountain well. There are pros and cons for ice axe leashes — I’m in the pro camp mainly because I’m worried about accidentally dropping the ice axe, which could injure someone below and leave you stranded on the side of the mountain (for those curious about the cons, in switchback travel you’ll need to keep switching the axe to the uphill side, which is annoying with a leash. Also, in a fall a leashed axe has a greater chance of impaling you). I’m a big fan of the Black Diamond ice axes — they’re solid, lightweight, and most importantly haven’t failed me yet.

Buy Black Diamond Raven Ice Axe with Leash on Amazon
Helmet:
Wear one. Helmets are so light these days there’s absolutely no excuse not to wear one, sometimes I even forget it’s on my head. I use a lightweight Black Diamond MIPS helmet (MIPS is the latest in skull protection technology) which, despite some reviews of cracking, I haven’t personally had issues with yet.

Buy Vision MIPS Climbing Helmet on Amazon
Avalanche Gear:
We rented avalanche gear from the Mount Shasta’s Fifth Season. There are three things you need — an avalanche shovel, a beacon, and a probe. At minimum you should watch a YouTube video on how to recover someone. In short, everyone in the group should carry beacons in active mode so if someone goes under, the other members can use their beacons to find the buried person. Then the probe (basically a long stick) is used to search for the body under the snow, and then you use the shovel to dig the person out. God forbid you ever need to do this because, according to the American Avalanche Association, after 35 minutes the survival rate is just 37%. Most people need to be rescued in the first 15 minutes. The gear is expensive, so we recommend renting, but if you plan on lots of snow travel there are some good options on Amazon:

Buy BCA Avalanche Gear Kit on Amazon
The Trip:
George and I drove up Saturday morning in mid-May from the Bay Area, and Mount Shasta came into view when we were still 127 miles away. The surrounding areas are so flat, the peak so massive, that as the drive progressed the mountain kept getting bigger and bigger until the entire windshield was just Mount Shasta, 14,000 feet of blinding snow and icy ramparts. We stopped in town at The Fifth Season outdoor store to buy our climbing permits and rent avalanche gear. Then we drove up to Bunny Flat, the start of the climb.
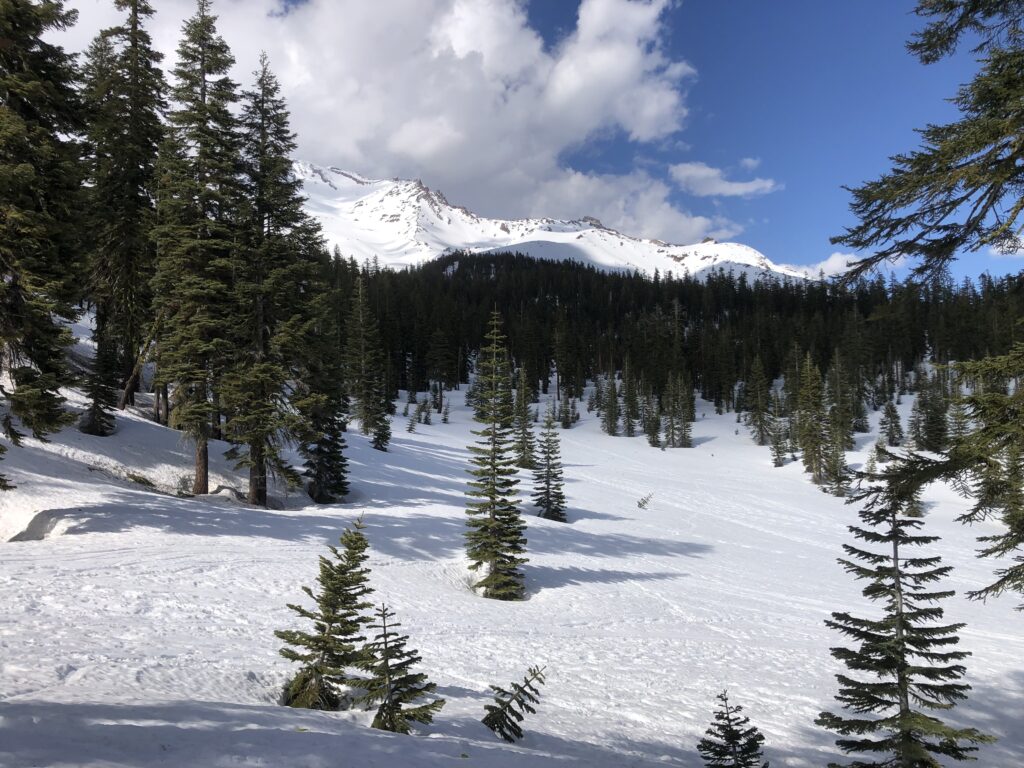
The first challenge is getting from the Bunny Flat parking lot up to the top of the snowpack on the trail, which can be several feet up. If that seems difficult, it may be a sign to turn back now. Luckily for us, the snow was only a few feet up from the lot, but you’d have to get creative if the snowpack was any higher. Once we managed to get all of our gear and ourselves onto the trail, all we had left to do was hike. Like all volcanoes, the trail starts out flat and pleasant enough and wandered its way through fairly open stands of forest.
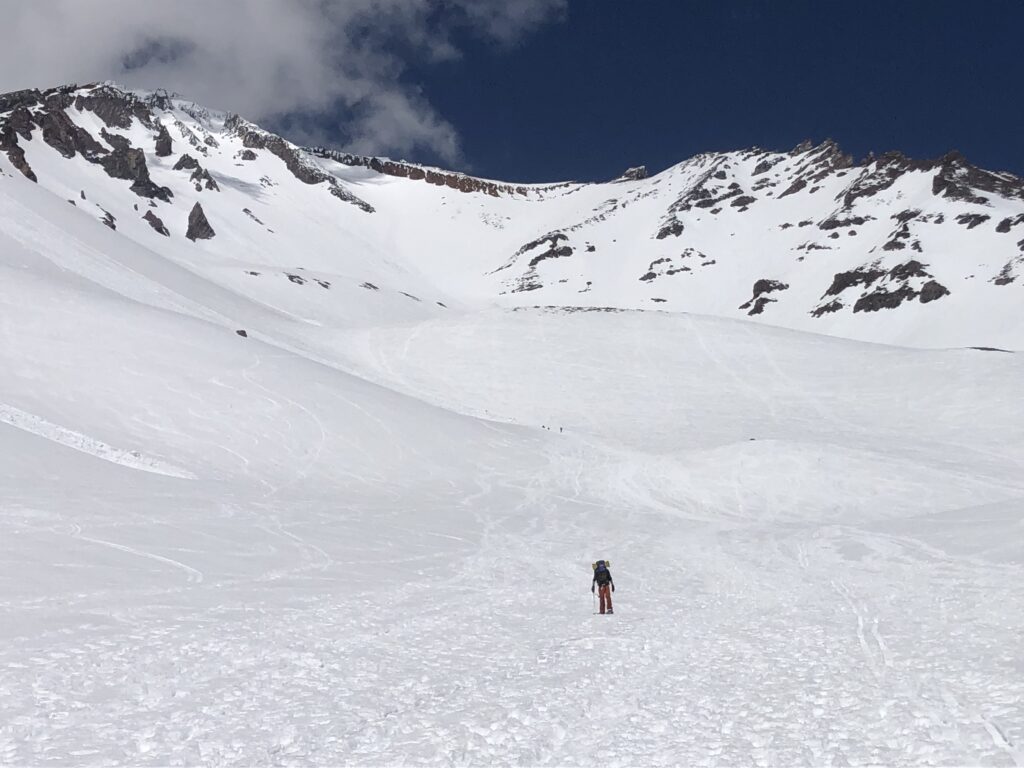
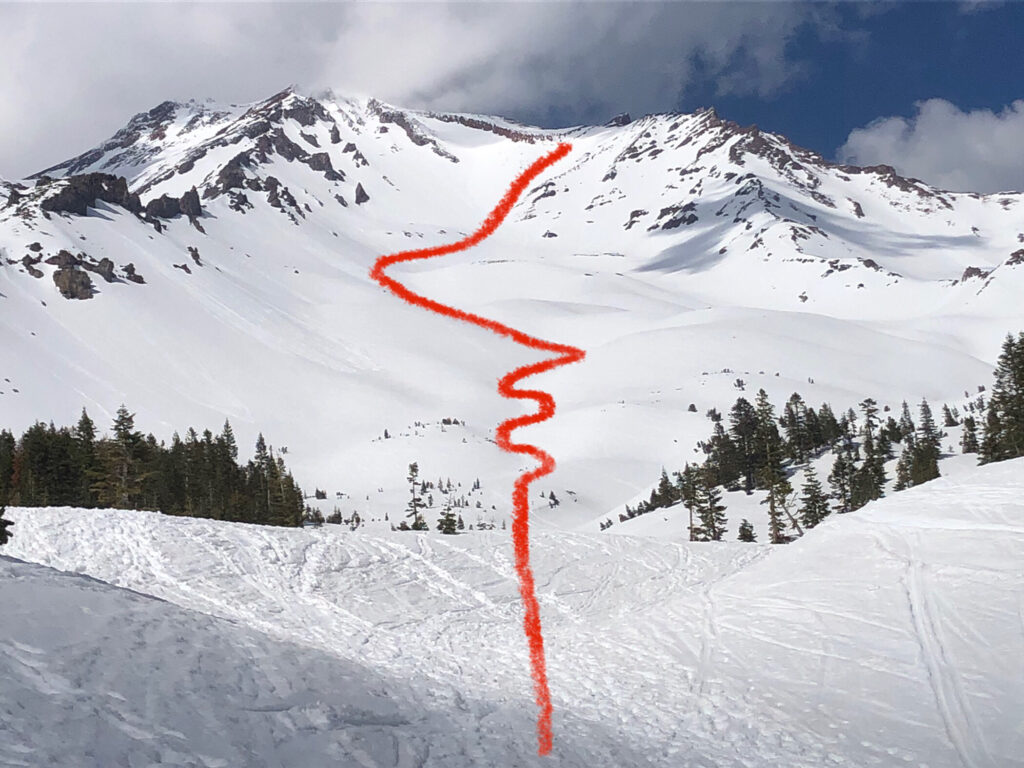
It was so so hot and so so bright, and the going was slow wearing snowshoes. I applied suntan lotion everywhere but I still got a serious burn under my nose and in my nostrils from all of the sunlight reflecting off the snow. It’s the worst burn I’ve ever gotten, and I won’t go into the details, but for about a week afterwards it looked like the bottom half of my nose was melting. After a couple miles the trail breaks out from the trees and you get a view of Mount Shasta, in its full glory, and the route you’ll need to take up to the summit (which I’ve marked in red). This is the part where I questioned if what we were doing was smart.
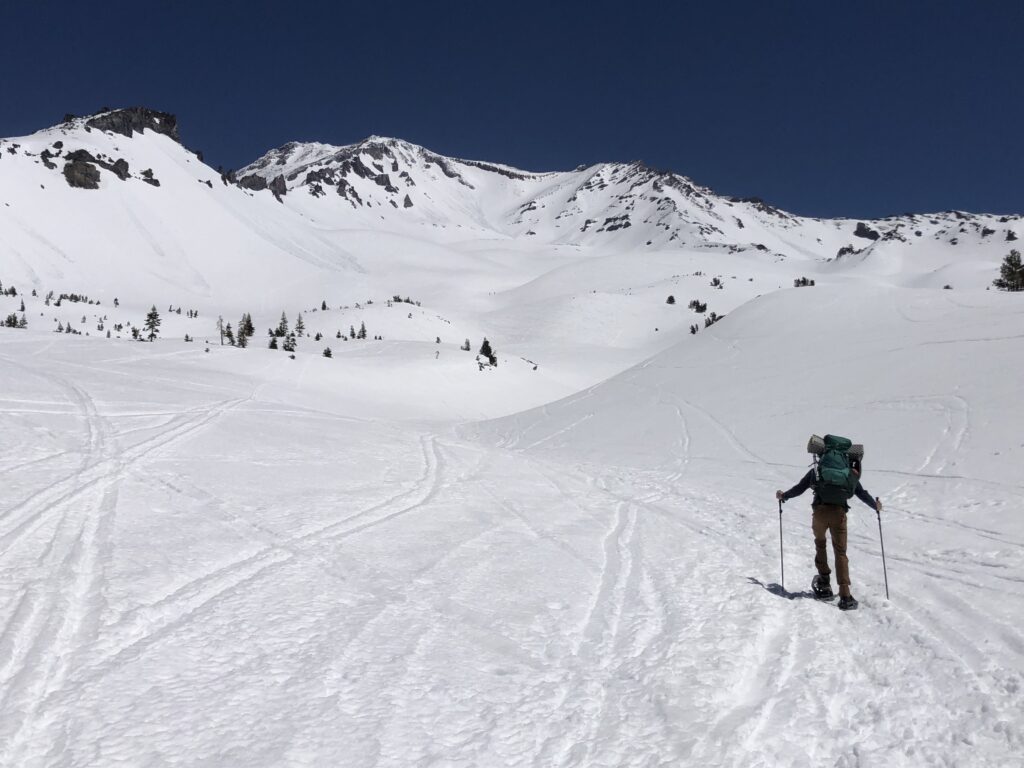
We slowly made our way around the snowy hills you see in the mid-ground, the trail getting steadily steeper but still easily navigable. If it just wasn’t so hot! I cursed myself for bringing a zillion layers; I was ready to hike in shorts and t-shirt and fry myself into a burnt crisp. Eventually, after 5 or 6 hours, we made it up to Helen Lake. The view from Helen Lake is incredible; it’s the last flat spot before the real climb begins, and has a great climbing community vibe with all of the other climbers camped out before the big summit push. We ended up camping next to a pilot who had flown his little plane from San Diego to Mount Shasta — with refueling, he said it took him 12 hours, which is about the same amount of time a car would take to make the same trip.
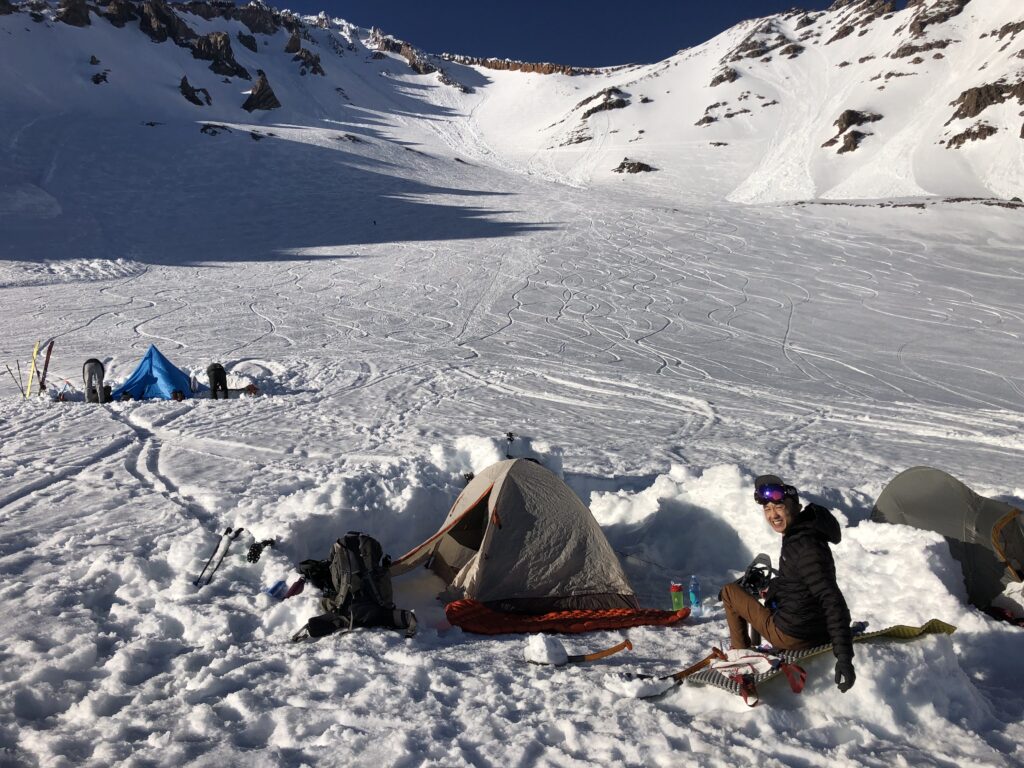
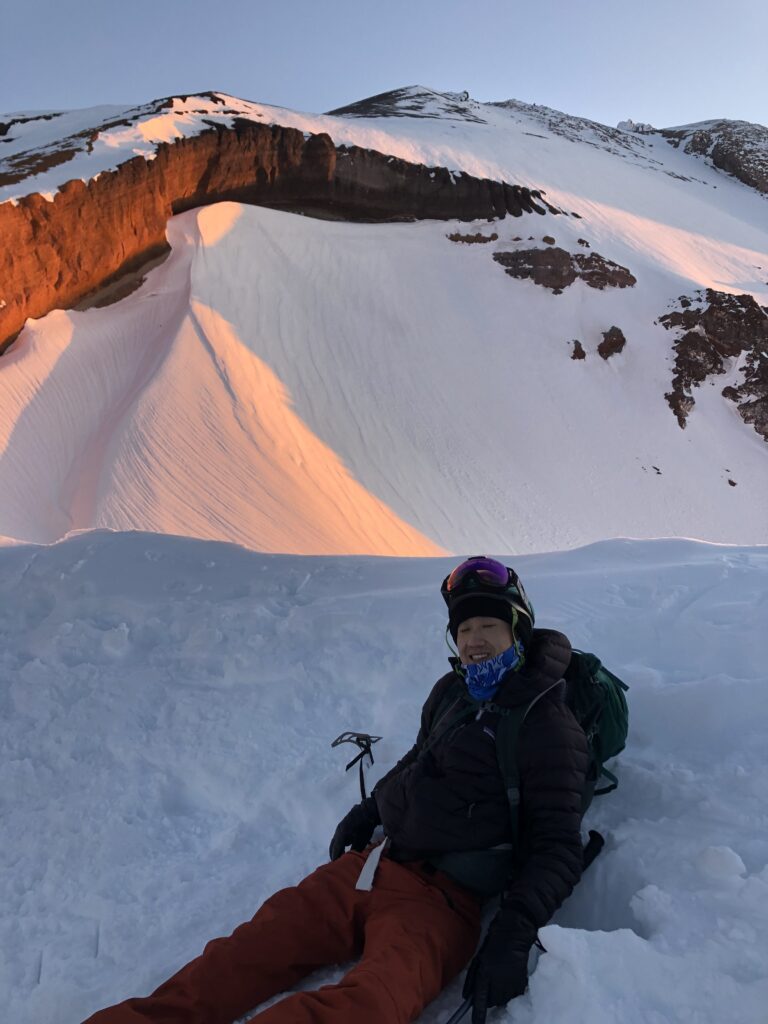
We spent the evening building a snow fort around our tent to block out the wind, cooking dinner, and melting snow for water the next day. The melting process took forever. I had George set out our avalanche shovel with snow to have the sun help us with the initial melt. Then, George would chop up the snow into smaller pieces and then I used our gas stove and kettle to melt it the rest of the way. There’s got to be a more efficient way to do this because it took us an hour or two to get just a few liters of water. It was close to the solstice so it didn’t get dark until around 9 PM, and then we bundled into our two person tent for a fitful and short night of sleep.
I remember that it was cold and the wind howled. I was now super glad I brought all those layers and before I knew it my alarm went off at 1:45 AM. It was time to start. We left our tent up with the gear we wouldn’t be taking to the summit (mainly the snowshoes and sleeping bags) and started on up Avalanche Gulch. The route quickly became a true climb. We chose not to rope in to each other — we had recently heard about a climbing crew where someone fell and brought down the entire crew, so it seemed safer to just be separated. For hours, in darkness, we did the same maneuver over and over again. Plant the ice axe, get a couple good steps in with the crampons, repeat. For thousands of steps, each one needing utmost concentration. There was a constant balance between wanting to attack the slope as head on as possible for the most stability, but also needing to go sideways along the slope to reduce the steepness. At one point I looked back down and saw the 2,000 feet of icy slope under me and the numerous headlamps of other climbers on their way up, and got such a degree of vertigo that I decided I wouldn’t look back down again. Finally, we made it to the Red Banks, which is the top of Avalanche Gulch and the hardest section with the ice axe. The Red Banks has a rock field that splits the snowfields; we ascended and descended the snowfield on the right, but pick the one that seems most stable and what others are currently doing. Once you get to the top of the Red Banks the rim opens up and you get a clear view of the summit. It was around 6 AM and dawn was breaking.
At this point it seemed like the summit should be near when it’s definitely not. We still had to climb Misery Hill, which is Shasta’s false summit and as the name implies is truly miserable. This area has less snow (I think the high winds blow most of it off the mountain) so it’s technically an easier section, but at this point the altitude and fatigue really got to us.
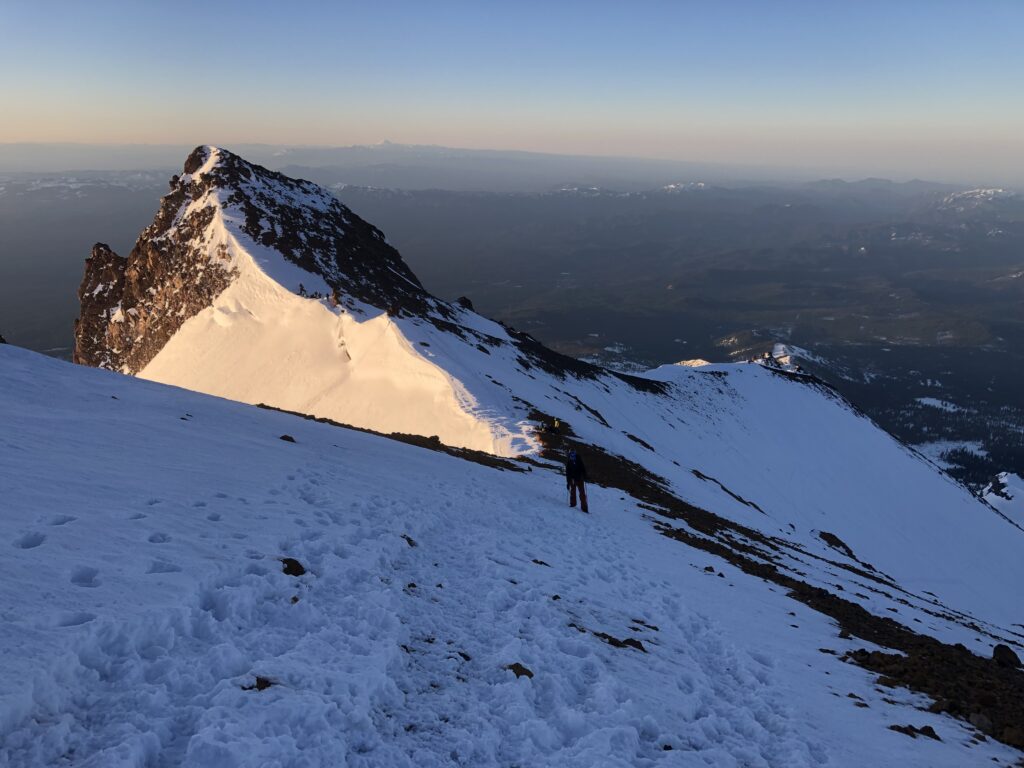
Somewhere along the way George fell behind, and when he caught up to me at a rest stop he told me that this was the end, that there was no way he could go further. We sat for a few minutes and he decided that as long as he could leave his pack on Misery Hill, he could make it to the summit. All he brought with him was his ice axe and a pack of Lifesaver gummies. But we were nearly there. After reaching the top of Misery Hill, at 13,800 feet, we only had about 300 vertical feet to go.
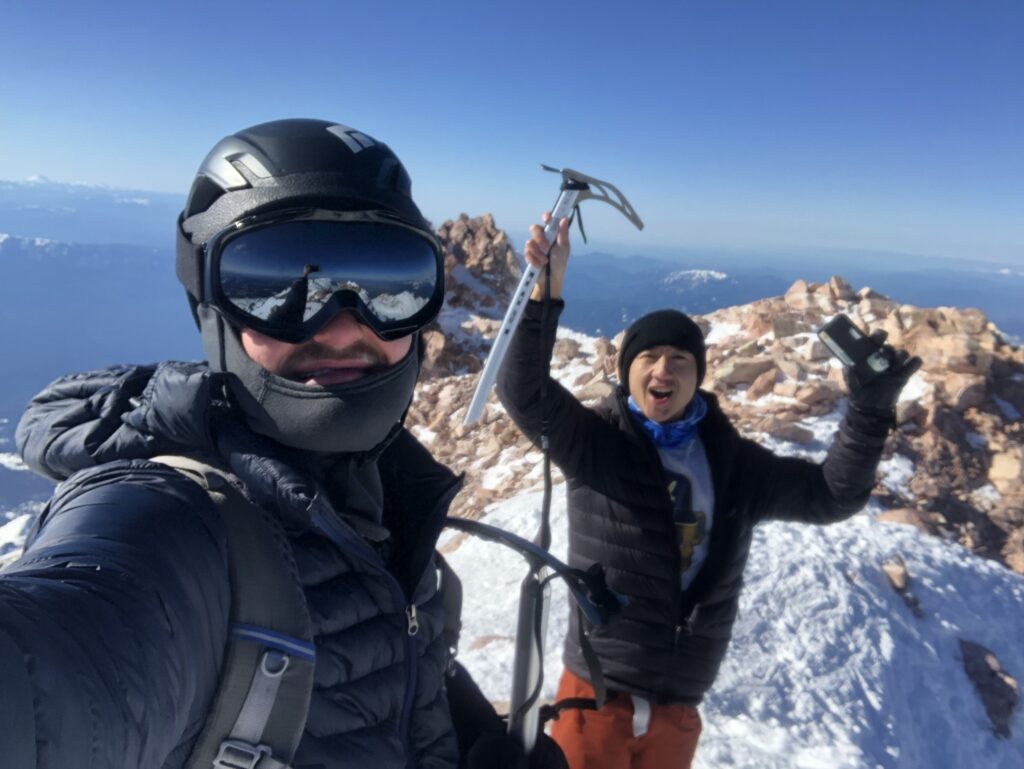
The last part, the summit spire, looked daunting. But behind the spire there was a hidden chute, and with relative ease and a few more ice axe swings we topped out at the summit, sulfuric fumes blowing hot gas at us from the vents below. It really was the top of the world. Mount Lassen, Trinity Alps, they were all tiny peaks below us. It was a crystal clear early morning blue — we could see Mount Hood in Oregon 300 miles away.
We ate breakfast at the top and began our descent. We ran into several parties still on their way up. In general, I recommend starting as early as possible to give yourself more time to summit and to avoid Avalanche Gulch in the heat of the day, when the avalanche risk is higher. We made quick work of Misery Hill and then got to glissade down Avalanche Gulch (sliding down the mountain using the ice axe to control the descent). We got back to camp around 1, rested for an hour (where it was once again super hot), packed up camp, and began the slow descent in snowshoes back to the car. All we kept talking about was how nice it would’ve been to have skis.
Around 5 PM we collapsed into the parking lot at Bunny Flats. For dinner we celebrated our successful summit at none other than the original Black Bear Diner in Mount Shasta’s downtown. On our way out of town I looked back out the rearview window and saw Mount Shasta’s wall of white, sparkling in the setting sun. We were just there, up on top. We had done it.